TL;DR:
- Effective file management and regular audits prevent storage clutter and cost overruns.
- Using modern codecs like HEVC reduces file size without sacrificing quality.
- Consistent backup routines and organized workflows protect data and improve efficiency.
Poor video management quietly drains creator and small business budgets every year, yet most people assume the only fix is buying more storage. That assumption is expensive. A single 4K shoot can generate 100GB or more of footage, and video storage costs spiral fast when you multiply that across weeks of content. The good news is that reducing what you spend on storage does not require sacrificing a single pixel of quality. This guide walks you through the exact strategies that keep your files lean, your footage sharp, and your budget intact.
Table of Contents
- Understanding the challenges of video management
- Optimizing storage: Solutions to reduce costs and clutter
- Compression and quality: Keeping high resolution without waste
- Workflows and backup: Protecting files while staying efficient
- Our take: What most creators get wrong about video management
- Next steps: Simplify your video management
- Frequently asked questions
Key Takeaways
| Point | Details |
|---|---|
| Organize for efficiency | Structure folders and file names to locate and manage projects quickly. |
| Use smart compression | Modern codecs and workflows minimize file size while retaining video quality. |
| Optimize storage selection | Balance local, external, and cloud storage to control costs. |
| Backup regularly | Automated or scheduled backups protect your valuable work and save time. |
Understanding the challenges of video management
Before diving into solutions, it helps to understand what makes video management uniquely challenging for creators and small businesses.
Camera technology keeps improving, and that is mostly great news. But higher resolution means bigger files. A one-minute clip shot in 4K at 60 frames per second can easily hit 4GB using standard codecs. Shoot a full day of content and you are looking at hundreds of gigabytes before you even open an editing app. Video files can quickly overwhelm available storage, and the costs that follow are rarely planned for in a creator's budget.
"The real storage crisis does not happen all at once. It creeps up on you, one project at a time, until suddenly you are paying for three cloud plans and two external drives and still running out of room."
The pain points most creators and small business owners run into include:
- Slow file access caused by disorganized folder structures that make finding specific clips a 20-minute ordeal
- Duplicate footage from multiple export attempts, backup copies, and forgotten test renders
- No clear backup system, which means one drive failure can wipe out months of work
- Accidental quality loss from exporting at wrong settings or using outdated compression methods
Maintaining video quality while optimizing space consistently ranks as a top challenge among content creators. The problem is not just technical. It is also behavioral. Most people react to storage problems instead of building systems that prevent them. That reactive approach costs more money and more time than any hardware upgrade ever will. Good video file management tips start with understanding the root cause, not just buying a bigger drive.
Optimizing storage: Solutions to reduce costs and clutter
With these challenges in mind, let's explore concrete strategies for managing storage more efficiently.
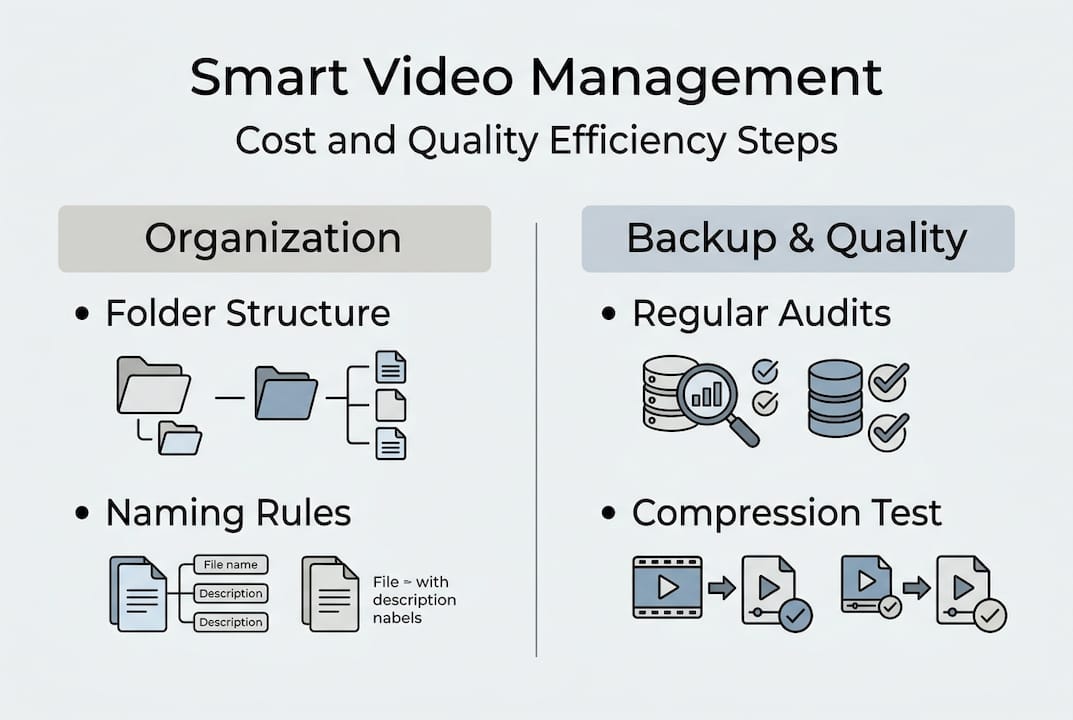
File organization is your first line of defense. A clear folder structure, something like Client > Project > Date > Raw/Exports, means you spend seconds finding files instead of minutes. Pair that with a consistent naming convention, for example "ClientName_ProjectTitle_Date_v1," and you eliminate the guesswork entirely. Systematic file organization can save significant storage space by making it easy to spot duplicates and outdated files before they pile up. Use the full organization checklist to build a system that scales with your workload.
Once your structure is in place, audit your storage regularly. Delete outtakes you will never use, remove duplicate exports, and move completed projects to an archive drive. This single habit can recover dozens of gigabytes every month without touching your active projects.
Here is a quick cost comparison to help you decide where your files should live:
| Storage type | Average cost per TB | Best for |
|---|---|---|
| Local SSD | One-time $80-$120 | Active editing projects |
| External HDD | One-time $20-$40 | Archives and backups |
| Cloud storage | $10-$25/month per TB | Collaboration and remote access |
Cloud storage offers flexibility but requires a careful cost-benefit review. It makes sense for teams that need remote access or for offsite backup redundancy. For solo creators storing large raw files, local drives almost always win on cost.
Key habits that cut clutter fast:
- Run a monthly "delete or archive" sweep across all project folders
- Keep only the final export and one backup of raw files for completed projects
- Use a dedicated "incoming" folder so new footage never gets mixed with finished work
Pro Tip: Set a recurring calendar reminder every 30 days to run your storage audit. Pair it with your invoicing day so it becomes part of your regular business routine. Build an efficient storage workflow that runs on autopilot rather than willpower.
Compression and quality: Keeping high resolution without waste
With your storage strategy set, the next piece is maximizing quality without overloading drives.

Codec choice is the single biggest lever you have for controlling file size without touching resolution. H.264 has been the standard for years and plays on virtually every device. HEVC (H.265), the technology behind HEVCut, delivers files that are roughly 40 to 50 percent smaller than H.264 at the same visual quality. Modern video codecs can cut file sizes without any visible quality loss, which means you are not making a trade-off. You are just being smarter about encoding.
Bitrate and resolution decisions also matter a lot, especially when you are exporting for specific platforms:
| Platform | Recommended resolution | Target bitrate |
|---|---|---|
| YouTube | 4K (3840x2160) | 35-68 Mbps |
| Instagram Reels | 1080p (1920x1080) | 3.5-5 Mbps |
| LinkedIn video | 1080p (1920x1080) | 5-10 Mbps |
| Website embed | 720p (1280x720) | 2-4 Mbps |
Exporting at 4K when your platform caps playback at 1080p wastes storage and upload time. Match your export settings to the destination and you recover significant space without anyone noticing a difference.
A simple workflow for compression:
- Edit your project at full resolution
- Export a master file using HEVC at your target resolution
- Compare a short test clip against the original before committing to the full export
- Store the compressed master and delete the uncompressed version once verified
- Archive the project folder to your external drive
Pro Tip: Always run a 30-second test compression before processing a full project. Play both clips side by side at full screen. If you cannot spot the difference, the compressed version is your new standard. Check our video compression best practices for a deeper look at codec settings. Also review these cost-saving tips for video storage to combine compression with smart storage habits.
Workflows and backup: Protecting files while staying efficient
Great compression and storage mean little if your videos are not properly backed up. Efficient workflows bring it all together.
The most common backup mistake creators make is treating backup as something they will do later. Later becomes never, and never becomes a hard drive failure that wipes out a client project. A scheduled backup workflow prevents data loss and keeps your management system running smoothly.
Here is a practical routine you can follow after every project:
- Edit your footage and finalize the cut
- Export the final version at your target resolution and codec
- Compress using HEVC to reduce the file size before storage
- Backup the compressed file to at least two locations, one local and one offsite or cloud
- Archive the project folder to your external drive and remove it from your primary working drive
Common mistakes that undercut even good backup systems:
- Keeping full raw files indefinitely when only the final edit has real value
- Never verifying that backups actually completed and are readable
- Relying on a single backup location, which is not a backup at all
Pro Tip: Use free tools like FreeFileSync to automate your backup routine. Schedule it to run every Sunday night so your week always starts with a clean, protected library. Set a separate monthly reminder to test-restore one random file from your backup, confirming it is actually usable. Pair this habit with an efficient backup workflow and a solid video backup workflow to cover all your bases.
Our take: What most creators get wrong about video management
After covering the practical solutions, here is a perspective shaped by real-world experience working with content creators and small businesses.
The most common mistake we see is treating storage as an infrastructure problem when it is actually a habits problem. Creators buy a 4TB drive, feel relieved for three months, and then hit the same wall again because nothing about their workflow changed. Bigger drives are not a strategy. They are a delay.
The creators who spend the least on storage are not the ones with the cheapest hardware. They are the ones who compress consistently, audit regularly, and never let raw footage sit unprocessed for months. These are habits, not tools. And habits cost nothing.
Another thing most guides skip: the emotional weight of disorganized storage. When you cannot find a file quickly, you lose confidence in your own system. That friction slows down production and increases stress. A clean, predictable system built around top storage tips pays dividends in focus and speed, not just dollars.
Sustainable video management is not a one-time project. It is a rhythm you build into your week.
Next steps: Simplify your video management
Ready to put these strategies to work? Take control of your video storage starting today.
Knowing the right strategies is one thing. Executing them without the right tools is where most creators stall. HEVCut makes it straightforward to compress your videos using HEVC technology, cutting file sizes by up to 70% without touching your visual quality. No guesswork, no complicated settings.
Start by using the video size calculator to see exactly how much space you can recover from your current library. Then explore the full suite of HEVCut tools to build a compression and storage workflow that fits your production schedule. The free trial gives you a real look at the savings before you commit to anything.
Frequently asked questions
How can I reduce video storage costs without lowering quality?
Use efficient codecs like HEVC, compress files before archiving, and regularly remove unused footage. Video codecs and compression reduce file size with minimal quality loss, keeping your resolution intact.
What is the best way to organize large video libraries?
Build a clear folder structure, apply consistent file naming conventions, and move completed projects to an archive drive. File organization strategies reduce clutter and make retrieval fast.
Are cloud storage solutions cost-effective for small creators?
Cloud storage works well for collaboration and offsite backup, but costs add up fast without regular file reviews. Cloud storage is most cost-effective when paired with strong local organization.
How often should I back up my video files?
Back up after every major edit session and test your backups monthly to confirm they are readable. Scheduled backups are the most reliable way to prevent data loss.