
TL;DR:
- Storage architecture and file size are critical bottlenecks in high-resolution video workflows.
- Tiered storage optimizes speed and cost, using hot, warm, and cold tiers for different project phases.
- HEVC compression significantly reduces file sizes, improving storage efficiency and transfer speeds.
Most video professionals obsess over processor speed and RAM, yet the real bottleneck in high-resolution workflows is almost always storage architecture and file size. A blazing-fast CPU means little if your drives can't feed footage fast enough, or if your 4K files are bloated beyond reason. HEVC compression and smart storage design solve both problems simultaneously, cutting file sizes by nearly half while keeping visual quality intact. This guide breaks down tiered storage models, HEVC's real-world impact, and the protection strategies that keep your footage safe and your deadlines intact.
Table of Contents
- Why storage is the backbone of modern video workflows
- Understanding tiered storage: Hot, warm, and cold explained
- HEVC: Shrinking file sizes, powering efficient editing
- Performance and protection: Throughput, backups, and workflow safety
- What most creators get wrong about video storage
- Optimize your video workflow with HEVCut tools
- Frequently asked questions
Key Takeaways
| Point | Details |
|---|---|
| Tiered storage essentials | Smartly structuring your storage into hot, warm, and cold tiers streamlines editing and archiving. |
| HEVC powers big savings | Switching to HEVC can cut storage needs—and costs—by up to half compared to H.264. |
| Workflow safety first | Always follow the 3-2-1 backup rule and consider RAID6 for large drives to protect your projects. |
| Performance isn’t just hardware | Optimal throughput and proxy workflows ensure smooth, multi-editor high-res video production. |
Why storage is the backbone of modern video workflows
Every phase of video production touches storage. Capture fills drives fast. Editing demands sustained read speeds that many setups can't deliver. Review and approval cycles mean moving large files across teams and locations. Archiving locks footage away for years, sometimes decades. If any one of those phases has a weak link, the whole pipeline slows down.
Collaboration makes this even harder. Remote editors, colorists, and sound designers all need access to the same assets, often simultaneously. A single shared NAS (Network Attached Storage) serving four editors on a 4K project isn't a luxury anymore, it's a baseline requirement. Slow or unreliable storage doesn't just frustrate people, it costs money in overtime, missed deadlines, and corrupted files.
The risks of poor storage decisions are real:
- Data loss from drive failures with no redundancy
- Workflow delays when read speeds can't keep up with codec demands
- Cost overruns from emergency hardware purchases or cloud overage fees
- Collaboration breakdowns when file access becomes unpredictable
The solution most working studios have adopted is a tiered storage model. Each tier serves a specific purpose, and understanding how they work together is what separates cost-effective workflows from expensive, chaotic ones.
"Tiered storage architecture is standard practice: hot tier using NVMe or SSD for active editing, warm or nearline storage using NAS or RAID for recent projects, and cold or archive storage using HDD, LTO, or cloud for completed work." Storage for video projects
Thinking about cost-saving storage strategies early in a project prevents the scramble that happens when drives fill up mid-production. The tiered model gives you a framework to plan capacity, speed, and budget in advance rather than reacting to problems.
Understanding tiered storage: Hot, warm, and cold explained
With the basics in place, here's how modern pros structure storage for maximum efficiency across a project's lifecycle.
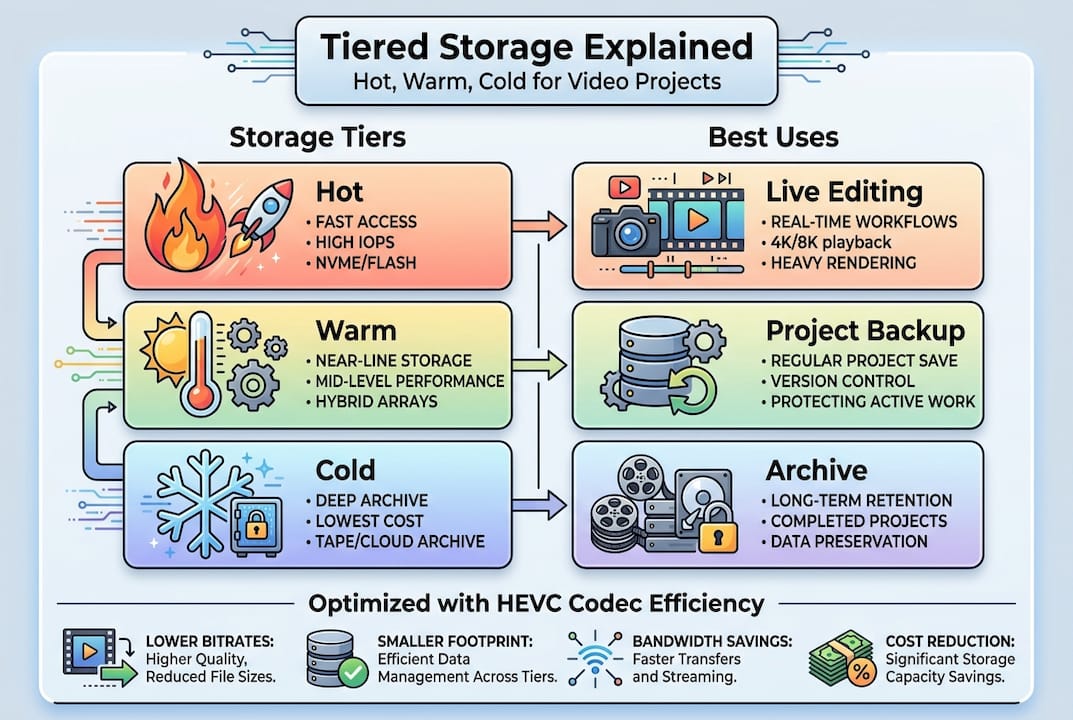
The hot tier is your fastest storage, typically NVMe SSDs. This is where active project files live during editing. Speeds above 3,000 MB/s are common with NVMe, which is essential for real-time playback of uncompressed or lightly compressed 4K footage. Cost per gigabyte is high, so you keep only what you're actively working on here.
The warm tier uses NAS or RAID arrays, usually spinning hard drives or SATA SSDs in a RAID configuration. This is where recent projects sit after the initial edit, waiting for review, color grading, or final delivery. Speeds are slower than NVMe but more than adequate for most tasks, and cost per gigabyte drops significantly.
The cold tier covers long-term archiving. LTO tape, high-capacity HDDs, and cloud object storage all fit here. Access times are slower, sometimes minutes for tape retrieval, but the cost per terabyte is the lowest of any option. Completed projects belong here.
| Tier | Technology | Speed | Cost per TB | Best for |
|---|---|---|---|---|
| Hot | NVMe/SSD | Very high | High | Active editing |
| Warm | NAS/RAID | Moderate | Medium | Recent projects |
| Cold | HDD/LTO/Cloud | Low | Low | Archiving |
Balancing investment across tiers is a judgment call. Most studios spend too much on hot storage and not enough on warm and cold. A better approach is to size your hot tier for your active project load only, then let everything else flow downstream automatically.
Pro Tip: Many professionals underutilize cold storage. Setting automatic archive rules, such as moving projects older than 90 days to cold storage, can cut your warm tier costs by 30 to 40 percent without sacrificing accessibility when you need to revisit old work.
For teams focused on HEVC optimization, the tiered model becomes even more powerful because compressed files move through tiers faster and take up less space at every level.
HEVC: Shrinking file sizes, powering efficient editing
Now that you know how tiers work, consider how the right compression codec can make or break your storage budget and editing speed.
HEVC (H.265) is the most significant compression advancement available to working video professionals right now. The numbers are hard to ignore: HEVC reduces storage needs by 40 to 50 percent compared to H.264 at equivalent visual quality. A 10-minute 4K clip that takes roughly 6 GB in H.264 drops to around 3 GB in HEVC. Scale that across a feature-length project or a year of content production, and the savings become substantial.

Here's what that looks like at scale:
| Format | 10,000 hours at 1080p | 10-minute 4K clip |
|---|---|---|
| H.264 | ~45 TB | ~6 GB |
| HEVC | ~22.5 TB | ~3 GB |
The efficiency gains from HEVC extend beyond raw storage:
- Lower cloud storage costs because you're uploading and storing smaller files
- Faster file transfers across teams and remote locations
- Longer camera battery life since encoding is more efficient on modern chips
- More footage per card when shooting in the field
That said, HEVC has a real trade-off. The codec is computationally demanding to decode, which means direct editing of HEVC files on a NAS or over a network can cause dropped frames and sluggish timelines. This is especially true on older workstations without hardware decode acceleration.
The fix is a proxy workflow. You generate lower-resolution proxy files from your HEVC originals, edit with those proxies for speed, then relink to the high-quality originals for export. Most professional editing applications support this natively. Understanding the full benefits of HEVC alongside its decode demands helps you plan a workflow that captures the savings without the frustration. For a deeper look at how codecs affect your storage, video compression explained covers the technical side without the jargon.
Performance and protection: Throughput, backups, and workflow safety
Efficient storage isn't just about size and speed. Protecting your footage and workflow matters just as much as how fast your drives spin.
For 4K HEVC editing, throughput requirements are specific. NVMe SSDs need over 400 to 500 MB/s sustained read speeds for smooth single-editor 4K playback. For multi-editor NAS setups, a 10 Gigabit Ethernet connection is the minimum, since 4K ProRes 422 alone demands roughly 88 MB/s per editor. Trying to run a four-person team on 1GbE is a recipe for dropped frames and frustrated colorists.
Protection is where many studios cut corners until something goes wrong. Three strategies every professional workflow needs:
- RAID6 redundancy on your NAS or warm tier array. RAID6 can survive two simultaneous drive failures, which matters more than ever on large-capacity drives that take days to rebuild.
- The 3-2-1 backup rule applied without exception to all project files.
- Proxy-based editing for HEVC files to reduce network bandwidth demands and protect originals from accidental modification.
"The 3-2-1 backup rule is essential: keep three copies of your data, on two different types of media, with one copy stored offsite."
Pro Tip: Prefer RAID6 over RAID5 whenever your drives exceed 4 TB each. Larger drives take longer to rebuild after a failure, and during that rebuild window, a second failure destroys everything. The extra drive RAID6 requires is cheap insurance.
For teams thinking about upgrading storage or reviewing their current setup, these storage tips offer practical guidance on balancing performance and protection without overspending.
What most creators get wrong about video storage
After seeing common best practices, it's worth pausing to look at what even seasoned pros tend to overlook.
Here's the uncomfortable truth: most storage problems on professional video sets aren't hardware problems. They're workflow problems. Studios buy faster SSDs when what they actually need is a better archive policy. They add more NAS capacity when they should be moving completed projects to cold storage. They blame their network when the real issue is editing HEVC originals directly instead of using proxies.
The best return on investment in storage almost never comes from buying faster hardware. It comes from understanding storage costs clearly, implementing smart tiering, enforcing backup discipline, and using HEVC-driven compression to reduce the volume of data you're managing in the first place. A well-structured workflow on modest hardware consistently outperforms a poorly organized workflow on expensive gear. Speed matters, but strategy matters more.
Optimize your video workflow with HEVCut tools
Now that you understand storage's crucial role, here's how to make improvements quickly and with confidence.
Knowing the theory is one thing. Knowing exactly how much storage you'll need for your next project, or how much you'd save by switching to HEVC, is what actually moves the needle on your budget.
HEVCut gives you the tools to answer those questions instantly. Use the video size calculator to estimate file sizes across codecs before you even start shooting, so you can plan your hot and warm tier capacity accurately. The storage calculator helps you map out total project storage needs and see the real dollar difference that HEVC compression makes. No guesswork, no spreadsheet math, just clear numbers you can act on today.
Frequently asked questions
What is the 3-2-1 backup rule and why is it important?
The 3-2-1 backup rule means keeping three copies of your data on two types of media, with one copy stored offsite to protect against data loss. It ensures that no single failure, whether a drive crash, fire, or theft, can wipe out your footage entirely.
Why is HEVC better than H.264 for video storage?
HEVC reduces storage needs by 40 to 50 percent compared to H.264 at equivalent quality, making it ideal for high-resolution projects where storage costs add up fast.
How much throughput do I need for 4K HEVC video editing?
You need NVMe SSDs over 400 to 500 MB/s reads and 10GbE network connections for smooth multi-editor 4K workflows, since each 4K ProRes 422 stream demands roughly 88 MB/s per editor.
What can slow down my video workflow besides hardware?
Inefficient storage architecture, poor backup strategies, and not using proxies for HEVC files often cause bigger bottlenecks than hardware limitations, especially when editing over a network.
Recommended
- Storage optimization in 2026: leveraging HEVC for creators
- Upgrading storage with advanced video compression in 2026
- Video file management tips for creators in 2026
- Cost-saving storage strategies for video creators 2026
- Complete Guide to Using Video in Education | Colossus Systems