
TL;DR:
- HEVC (H.265) reduces 4K video file sizes by up to 64% without quality loss.
- Compression finds redundancy in video data, enabling smaller file sizes and faster uploads.
- Use simple workflows with CRF and presets for effective HEVC encoding and storage savings.
If you shoot 4K video on your phone or camera, storage fills up fast. The good news is that HEVC (H.265) can cut your video file sizes by up to 64% at 4K resolution compared to the older H.264 format, with no visible drop in quality. The frustrating part? Terms like CRF, GOP, bitstream, and quantization make the whole process sound like a graduate-level engineering course. This guide strips away the confusion. You will learn exactly how HEVC compression works, how much space it can actually save you, and how to run a simple, repeatable workflow that gets real results, even if you have never touched an encoder before.
Table of Contents
- What is video compression? Breaking down the basics
- How does HEVC (H.265) compression work?
- HEVC vs. H.264: How much space can you really save?
- A simple workflow: Optimizing video files with HEVC
- Why 'set and forget' with video compression fails beginners
- Get the most out of your HEVC compression journey
- Frequently asked questions
Key Takeaways
| Point | Details |
|---|---|
| HEVC saves storage | Switching to HEVC typically cuts your video file sizes by 50% or more without losing quality. |
| Step-by-step workflow | A clear encoding process helps beginners avoid mistakes and validate their results. |
| Small tweaks matter | Adjusting rate control and presets can dramatically improve your compression outcomes. |
| Validate quality visually | Always compare compressed output with your original videos before deleting old files. |
What is video compression? Breaking down the basics
Video compression is the process of reducing a video file's size by removing or reorganizing data that your eyes would never notice anyway. Before you can appreciate what HEVC does, it helps to understand why video files get so large in the first place.
Every video is made up of frames, and every frame is a grid of pixels. Each pixel carries color and brightness data. A single minute of uncompressed 4K footage can weigh in at several gigabytes because the math is brutal: more pixels times more frames per second times more color depth equals enormous file sizes. Add HDR data on top, and you are looking at storage numbers that make even large hard drives nervous.
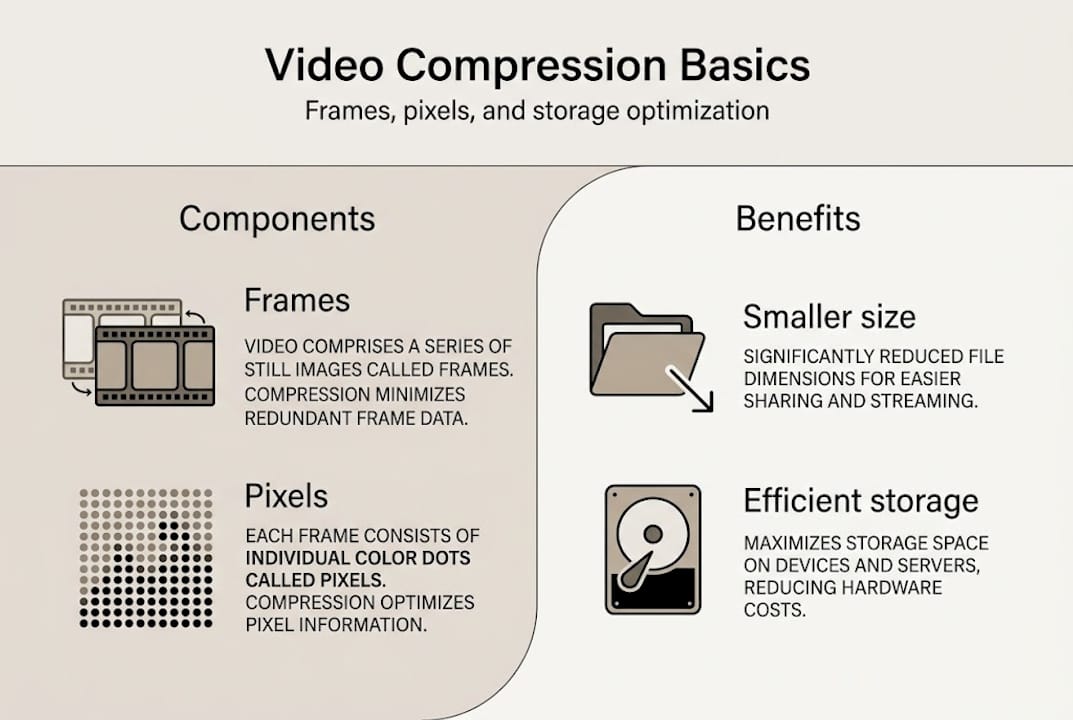
The key insight that makes compression possible is redundancy. Most video contains massive amounts of repeated or predictable information. A blue sky in the background stays blue across dozens of frames. A static wall behind a talking head barely changes at all. Compression algorithms find this repetition and encode it efficiently instead of storing it over and over.
Here are the basic terms you will encounter:
- Bitstream: The compressed sequence of data that makes up your encoded video file.
- Redundancy: Repeated or predictable information that compression targets for removal.
- Intra-prediction: Predicting pixel values within a single frame using nearby pixels.
- Inter-prediction: Predicting pixel values across multiple frames using motion estimation.
"HEVC compression relies on predicting and removing redundancy in video data using advanced encoding techniques."
The most important mindset shift for beginners is this: compression is not just about making files smaller. It is about finding the best tradeoff between storage size and visual quality for your specific use case. Understanding why HEVC saves space compared to older codecs starts with understanding this redundancy-targeting process.
How does HEVC (H.265) compression work?
HEVC, which stands for High Efficiency Video Coding, is the successor to H.264 and was designed specifically to handle the demands of 4K, HDR, and high-frame-rate content. Where H.264 was built for an era of 1080p streaming, HEVC was engineered to cut the data load in half while preserving the same visual experience.
Here is how the encoding process works, step by step:
- Prediction: The encoder analyzes each block of pixels and predicts its content based on nearby blocks (intra) or previous/future frames (inter). Only the difference between the prediction and the real data is stored.
- Transform: The prediction error (called the residual) is converted from pixel values into frequency data using a mathematical transform. This makes the data easier to compress.
- Quantization: The frequency data is rounded and simplified. This is where quality loss can occur, and it is the stage you control with settings like CRF.
- Entropy coding: The quantized data is compressed further using lossless statistical methods, squeezing out every last bit of redundancy.
- Output bitstream: The final compressed data is packaged into a file format like MP4 or MKV.
| Stage | What it does | Why it matters |
|---|---|---|
| Prediction | Finds reusable data | Reduces what needs storing |
| Transform | Converts to frequency data | Makes compression more efficient |
| Quantization | Simplifies values | Controls quality vs. size tradeoff |
| Entropy coding | Lossless final squeeze | Maximizes compression gains |
| Output bitstream | Packages the file | Produces your final video |
HEVC uses Coding Tree Units (CTUs) up to 64x64 pixels, which are recursively split into smaller blocks depending on the complexity of the image. Think of it like packing a suitcase: well-folded clothes fill the same bag more efficiently than clothes thrown in randomly. CTUs let the encoder pack simple areas loosely and complex areas tightly, all in one pass.
Pro Tip: As a beginner, you do not need to master every stage. Focus on two controls: the preset (which sets encoding speed vs. efficiency) and the rate control setting (CRF or target bitrate). Those two levers give you most of the practical control you need for HEVC for 4K content.
HEVC vs. H.264: How much space can you really save?
Numbers tell the story better than any analogy. Here is what you can realistically expect when encoding the same one-minute video clip in H.264 versus HEVC at comparable visual quality.

| Format | 1080p (1 min) | 4K (1 min) |
|---|---|---|
| H.264 | ~175 MB | ~600 MB |
| HEVC (H.265) | ~90 MB | ~220 MB |
| Space saved | ~49% | ~63% |
These are approximate figures based on typical bitrate settings, but they reflect real-world results for most content types. The savings are even larger for high-motion content like sports or action footage when you tune the encoder properly.
HEVC reduces bitrate by 50 to 64% compared to H.264 at similar visual quality levels.
Here is what those numbers mean in practical terms:
- Store twice as many videos on the same device or drive without buying more hardware.
- Upload and download faster because smaller files move through networks more quickly.
- Lower cloud storage costs by avoiding constant plan upgrades. You can read more about reducing cloud storage with HEVC to see exactly how much you could save.
- Share more easily via email or messaging apps that cap attachment sizes.
One myth worth busting: smaller HEVC files do not look worse than larger H.264 files. When encoded correctly at the same perceptual quality level, HEVC files are visually identical to their H.264 counterparts. The codec is simply smarter about how it stores the same information.
One thing to keep in mind is compatibility. Most modern smartphones, smart TVs, and computers handle HEVC playback without any issues. Older devices or software media players may need a codec update or a compatible app to play HEVC files smoothly. It is a minor hurdle, and one that is becoming less common every year.
A simple workflow: Optimizing video files with HEVC
Knowing the theory is useful. Having a repeatable process is better. Here is a beginner-friendly workflow you can follow every time you want to optimize a video file.
- Decide if re-encoding is worth it. Not every video needs to be re-encoded. Best practice is to only re-encode when you need to save storage or change the format. Re-encoding an already-compressed file can introduce quality loss.
- Choose your source file. Always start from the highest-quality version available. Re-encoding a low-bitrate file will not recover lost quality.
- Select your rate control method. CRF (Constant Rate Factor) is the easiest option for beginners. A CRF value of 23 to 28 is a good starting range for HEVC. Lower numbers mean higher quality and larger files.
- Pick a preset. Presets range from ultrafast to veryslow. Slower presets produce smaller files at the same quality but take more time. For most beginners, the medium or slow preset is a practical balance.
- Encode the file. A basic ffmpeg command using libx265 looks like this: "ffmpeg -i input.mp4 -c:v libx265 -crf 26 -preset slow -c:a copy output.mp4`. This keeps your audio untouched and applies HEVC compression to the video stream.
- Validate quality before deleting originals. Play both files side by side. Look at fast-motion scenes, fine textures, and dark areas. Numbers alone do not tell you if the output looks good.
Common mistakes to avoid:
- Setting the CRF too high (above 30) and ending up with blocky, degraded footage.
- Forgetting to copy or re-encode the audio stream, which can result in silent output files.
- Skipping the visual check and assuming the numbers are enough.
Pro Tip: Always compare your encoded output against the original before you delete anything. A quick side-by-side playback in VLC or any media player takes two minutes and can save you from permanent quality loss.
For a deeper look at how to structure your process, the HEVC storage optimization workflow guide covers creator-specific scenarios in detail. You can also review compression best practices for a broader quality and storage framework. If you are brand new to video production concepts in general, video production essentials is a solid foundation.
Why 'set and forget' with video compression fails beginners
Here is a lesson that takes most people longer than it should to learn: there is no universal HEVC setting that works perfectly for every video.
Default encoder settings are designed to be safe and average, not optimal. A CRF of 28 might look great on a slow-paced interview but fall apart on a high-motion sports clip. A preset that works fine on your laptop might time out on a slower machine. Blindly trusting defaults is like ordering the same coffee every day without ever tasting it.
Compression is more like brewing coffee than pushing a button. The beans (your source file), the grind (your preset), and the brew time (encoding speed) all interact. You have to taste the result and adjust. That means running small test encodes, checking the output visually, and tweaking one variable at a time.
The beginners who get the best results are the ones who optimize workflows with HEVC deliberately, not the ones who pick a setting and walk away. Start with a short clip, not your entire library. Get comfortable with one workflow before scaling it up. That iterative approach builds real confidence faster than any tutorial.
Get the most out of your HEVC compression journey
Ready to try compressing your own videos? Here are some tools that make the process easier, even for first-timers.
Before you encode a full library of files, use the video size calculator at HEVCut to forecast exactly how much space you will save at different quality settings. It removes the guesswork and helps you set realistic expectations before you commit encoding time. The HEVCut platform also offers a free trial with automatic HEVC processing, so you can see real results on your own files without needing to learn command-line tools first. Whether you are a smartphone user trying to free up space or a content creator managing a growing archive, HEVCut gives you a practical, accessible starting point for real storage savings.
Frequently asked questions
What is the best CRF value for HEVC beginner encoding?
A CRF value between 23 and 28 is a safe starting point for most HEVC beginner encodes. Lower values give higher quality but produce larger files, so tune CRF while validating quality to find your ideal balance.
How does HEVC reduce video file size?
HEVC uses advanced prediction and larger block sizes to identify and remove redundant data across frames, then applies entropy coding for a final lossless squeeze. The result is a 64% bitrate reduction at 4K compared to H.264 at similar quality.
Do I need to re-encode all my old videos to HEVC?
Only re-encode old videos if you genuinely need to save storage or want better quality at lower bitrates. As best practice confirms, unnecessary re-encoding can reduce quality, so be selective.
Can all devices play HEVC video files?
Most modern devices support HEVC natively, but some older hardware and software media players may require a codec update or a compatible playback app to handle HEVC files correctly.
Recommended
- Storage optimization in 2026: leveraging HEVC for creators
- Upgrading storage with advanced video compression in 2026
- Save cloud space: Cut video size by 70% with HEVC in 2026
- Storage Savings Calculator - See How Much Space You Can Free | HEVCut
- Video Production Essentials: Beginner's Comprehensive Guide